
Create Your Own Proxy Connection Tool??

This program was coded in Visual Studio 2010 however the same code should work in all versions from Visual Studio 2008 and after.
1. Open Visual Studio and create a basic form. The following are the names for all items on the form:
CODE :
Form 1 = frmMain
Textbox = txtProxy
Button1 = btnConnect
Button 2 = btnDisconnect
Status Strip = StatusStrip1
Status Strip Label = lblStatus
2. Changes for the main form include the following. This is optional and should only be used if you want your application to have the same look at mine:
CODE :
Text = Proxy Connection Tool
Size = 389, 171
MinimizeBox = False
MaximizeBox = False
FormBorderStyle = FixedDialog
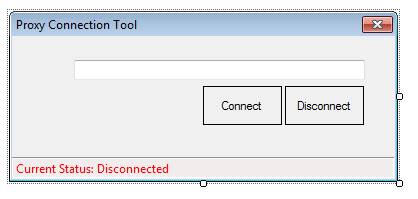
3. To have your buttons and status strip label look the same as mine (shown in screenshot below) simply change the following in the properties pane for each.
Button Properties:
CODE :
FlatStyle = Flat
Cursor = Hand
btnConnect Text = Connect
btnDisconnect Text = Disconnect
Status Properties:
CODE :
Text = Current Status: Disconnected
ForeColor = Red
After you have completed these steps you should have a form that looks similar to the screenshot below:
4. Now it is time to add in some code. Let’s start with the connect button. Simply add this code to the connect button:
CODE :
On Error Resume Next
Dim Splitter() As String = Nothing
Splitter = txtProxy.text.ToString.Split(":")
SetProxy(Splitter(0), Splitter(1))
This code will call the SetProxy sub which we will create in the next step. This code will also split the proxy IP and Port into two sections (IP & Port) and pass this to the SetProxy sub.
5. The next step is to create the SetProxy sub. Copy the following code and paste it below the btnConnect sub.
CODE :
Public Sub SetProxy(ByVal ServerName As String, ByVal port As Integer)
On Error Resume Next
Dim regkey1 As RegistryKey
regkey1 = Registry.CurrentUser.CreateSubKey("Software\Microsoft\Windows\CurrentVersion\Internet Settings", RegistryKeyPermissionCheck.Default)
regkey1.SetValue("ProxyServer", ServerName + ":" + port.ToString(), RegistryValueKind.Unknown)
regkey1.SetValue("ProxyEnable", True, RegistryValueKind.DWord)
regkey1.Close()
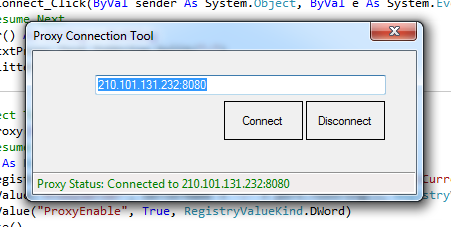
lblStatus.Text = "Proxy Status: Connected to " & txtProxy.text
lblStatus.ForeColor = Color.Green
End Sub
This sub sets the information into the registry and also changes the colour and text of the status label.
6. We then need to add code to our disconnect button. To do this simply paste the following code into the disconnect button. This code will disconnect the user and change the registry & status label back to normal.
CODE :
On Error Resume Next
Dim regKey As RegistryKey
regKey = Registry.CurrentUser.CreateSubKey("Software\Microsoft\Windows\CurrentVersion\Internet Settings", RegistryKeyPermissionCheck.Default)
regKey.SetValue("ProxyEnable", False, RegistryValueKind.DWord)
regKey.Close()
lblStatus.Text = "Proxy Status: Disconnected"
lblStatus.ForeColor = Color.Red
7. The final piece of code is to import Microsoft.Win32. To do this simply add the following code above “Public Class frmMain” in the code:
CODE :
Imports Microsoft.Win32
8. Now you should be able to run your application and enter a proxy (IP:Port) into the text box and connect to it using the connect button. Remember to disconnect from the proxy before closing the application as the application will not disconnect you on exit.
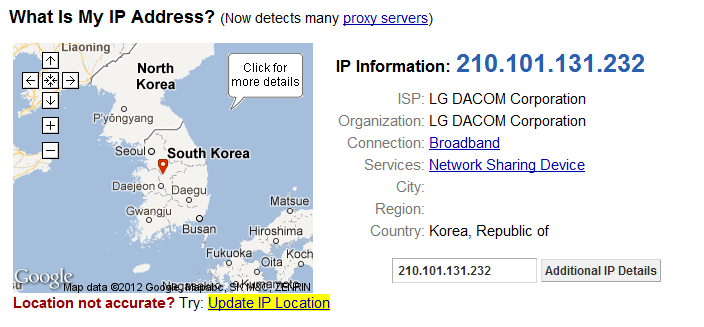
9. To check to make sure the application is working correctly, navigate to http://whatismyipaddress.com/ and see if your IP Address has changed.
0 comments:
Post a Comment