Breaking News
Loading...

Recent Post

Showing posts with label Backtrack. Show all posts
Saturday, April 12, 2014
Intro to Wireshark

Intro to Wireshark

Wireshark is a free and open-source packet analyzer. It is used for network troubleshooting, analysis, software and communications protocol development, and education. Originally named Ethereal, in May 2006 the project was renamed Wireshark due to trademark issues.
Wireshark is cross-platform, using the GTK+ widget toolkit in current releases, and Qt in the development version, to implement its user interface, and using pcap to capture packets; it runs on GNU/LinuxOS XBSDSolaris, and some other Unix-like operating systems, and on Microsoft Windows. There is also a terminal-based (non-GUI) version called TShark. Wireshark, and the other programs distributed with it such as TShark, are free software, released under the terms of the GNU General Public License.

Functionality

Wireshark is very similar to tcpdump, but has a graphical front-end, plus some integrated sorting and filtering options.
Wireshark allows the user to put network interface controllers that support promiscuous mode into that mode, in order to see all traffic visible on that interface, not just traffic addressed to one of the interface's configured addresses and broadcast/multicast traffic. However, when capturing with a packet analyzer in promiscuous mode on a port on a network switch, not all of the traffic travelling through the switch will necessarily be sent to the port on which the capture is being done, so capturing in promiscuous mode will not necessarily be sufficient to see all traffic on the network. Port mirroring or various network taps extend capture to any point on the network. Simple passive taps are extremely resistant to tampering.
On Linux, BSD, and OS X, with libpcap 1.0.0 or later, Wireshark 1.4 and later can also put wireless network interface controllers into monitor mode.

Features

Wireshark is software that "understands" the structure (encapsulation) of different networking protocols. It can parse and display the fields, along with their meanings as specified by different networking protocols. Wireshark uses pcap to capture packets, so it can only capture packets on the types of networks that pcap supports.
  • Data can be captured "from the wire" from a live network connection or read from a file of already-captured packets.
  • Live data can be read from a number of types of network, including EthernetIEEE 802.11PPP, and loopback.
  • Captured network data can be browsed via a GUI, or via the terminal (command line) version of the utility, TShark.
  • Captured files can be programmatically edited or converted via command-line switches to the "editcap" program.
  • Data display can be refined using a display filter.
  • Plug-ins can be created for dissecting new protocols.
  • VoIP calls in the captured traffic can be detected. If encoded in a compatible encoding, the media flow can even be played.
  • Raw USB traffic can be captured.
Wireshark's native network trace file format is the libpcap format supported by libpcap and WinPcap, so it can exchange captured network traces with other applications that use the same format, including tcpdump and CA NetMaster. It can also read captures from other network analyzers, such as snoopNetwork General's Sniffer, and Microsoft Network Monitor.


#Wireshark #Windows #Linux #Backtrack #Ubuntu #Kali-Linux
Sunday, December 8, 2013
How To Install Backtrack 5 On Virtual Machine ?

How To Install Backtrack 5 On Virtual Machine ?

Backtrack 5

If you want to experience and experiment with backtrack 5 hacking tools such as kismet, metasploit etc. Then today i am going to show you how you can install and run Backtrack 5 Operating System inside a virtual machine(VirtualBox). It works on all computers running any operating system such as Windows Xp, Windows 7, Or Mac Os X. So  lets get stared installing backtrack 5 on your operating system.


Downloading Softwares to install Backtrack on Virtual Box:


1. First you will need Virtual Machine to run Backtrack 5 which you can Download From VirtualBox Website. After downloading VirtualBox Install the program. Installing VirtualBox is really simple like any other program you install on your computer.
2. Then you will need Backtrack 5 .iso file which you can download from Here with below configuration. You can download it directly or via torrent thats your choice.

backtrack 5


Getting started installing Backtrack 5 on Virtual Box:


1. Open VirtualBox and Click on New. Then a popup box will appear in that write Name as backtrack, Type as Linux and Version as Ubuntu as shown in below picture and click on Next.
Backtrack on Virtualbox
2. Next allocate memory to your virtual machine. I usually allocate half the ram i have which is 2GB of 4GB as shown below and click Next.
virtual box
3. Then choose second option Create Virtual Hard Drive Now from three options and then click on Next.
4. Then Choose VDI(Virtual Disk Image) From all the options and click Next.
5. Now to options will come to allocate size on Hard Drive from that choose Dynamically Allocated and click Next
6. Then leave name as it is and allocate the size to arround 15-20GB and click Create.
7. Now you will have your virtual machine on left. To start it double click the virtual machine. As you running it for the first time you need to configure it.
8. Navigate to the Backtrack 5 .iso file we downloaded by clicking on button i highlighted in red in below image and select it and click on start.

virtual box

9. After clicking on start click Enter and leave the setting as it is and press Enter again.
10. Now it will ask for command so type startx and press Enter and it will load user interface of backtrack.
11. Click on Install Backtrack icon from desktop and it will open installation window. Now leave language to English and click on Forward. It will now ask for location, Enter your location and press Forward.
12. On Step 3,4,5,6 you don't need to do anything just click on Forward and on step 7 Click on Install. It will take couple of minutes and you will have backtrack 5 install on your computer.
13. Now will need to enter username and password to enter backtrack, the default username for backtrack is root and password is toor. You can use passswd command to change your password.
14. Done you now have Backtrack 5 running on your virtual machine.

Confused ?

If got problem installing backtrack 5 on your virtual machine or got struck on any of the steps, or liked our tutorial then leave a comment below i will be glad to help you out.

Friday, December 6, 2013
Download and Run Backtrack 5 on Android Devices

Download and Run Backtrack 5 on Android Devices

Hello Friends, today i'm talking about how to download and run backtrack 5 on android devices.
BackTrack is a Linux-based penetration testing arsenal that aids security professionals in the ability to perform assessments in a purely native environment dedicated to Hacking.


Download and Run Backtrack on Android Devices:

Requirements:


  • 1. Rooted Android Device with Busybox Installed.
  • 2. Download some apps from Android Market like Android Terminal Emulator and androidVNC.
  • 3. 7zip (for PC), for extracting the files around 3.3 GB free on internal sdcard (/sdcard/)
  • 4. Download Backtrack from here.

File Setup:

You need to do this only once,

  • 1. Download the files from the links provided in this thread.
  • 2. Extract the files using 7zip to a temporary folder (needs 3.3GB free on that drive)
  • 3. Connect your SGS2 to PC and mount USB storage.
  • 4. Create a folder named 'bt' (without quotes) in the root of your sdcard and copy the bt.img in that folder.
  • 5. Also place the file bt5_sgs2_shell_scripts_v2.zip in root of sdcard, this file has to be flashed via recovery.
  • 6. Once you verify that the above is correct then un-mount usb storage.
  • 7. Reboot into recovery and flash the file bt5_sgs2_shell_scripts_v2.zip stored in root of sdcard (or if you are using 4 app then just select the file for flashing and the app will do the rest)
  • 8. once ur phone reboots into OS just check the /sdcard/bt folder.
  • 9. Final directory structure should look like this:
  • /sdcard/bt/bt /sdcard/bt/bt.img /sdcard/bt/installbt.sh /sdcard/bt/startbt /sdcard/bt/stopbt
  • 10. Once you verify that the above is correct then you can proceed.
Launch BackTrack 5:


 1. Start Terminal Emulator app on your SGS2 and enter the following commands step by step (accept/allow any SuperUser request/popup that you may receive)
su
cd/sdcard/bt
sh installbt.sh
startbt
bt

2. Now you are in BackTrack5 shell.

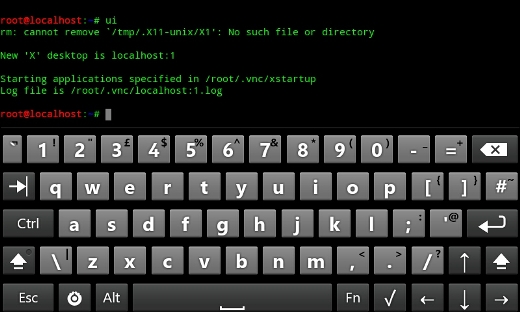
3. To launch GUI (vncserver) enter the command ui.


now note the number N shown localhost:N
e.g. as u can see from the above image that "New 'X' desktop is localhost:1", so N=1
the vncserver is running at (5900 + N, N=1 ; so server port is 5901)

4. Now launch androidVNC app on phone and fill in the detials as follows:
Nick : bt
Address : 127.0.0.1
Port : 5901
Password : 12345678
Username : <leave it blank>
Color Format : 24-bit color (4 bpp)

Inside vnc window select input mode (i personally recommend the following)
TouchPad (here your screen works like a big touchpad use it to navigate mouse.)

5. Then press connect, now you are in BackTrack GUI!

6.if you want to exit/close BT5 then u need to follow these steps:

close the androidVNC app (Menu > Disconnect)
Go back into Terminal Emulator app and enter the following commands
you should be at this shell root@localhost:~#
killui
exit

now you will get back to this shell> #
now enter the following commands to stop bt and exit
stopbt
exit
exit

you can now exit the Terminal Emulator app
i would also recommend that u reboot your android phone.
Monday, July 2, 2012
HACKING FACEBOOK ,GMAIL ACCOUNT USING BACKTRACK AND SET

HACKING FACEBOOK ,GMAIL ACCOUNT USING BACKTRACK AND SET


Hello, friends i am back with a latest post on hacking facebook,gmail accounts using backtrack and social engineering kit.Things you needed are following:---> 1. Backtrack 5 R2 2. Internet connection 3. A brain Now follow all my steps like i am showing in this post:-----> 


1. First open the social engineering kit using this command in cd /pentest/exploits/set and then press enter and then type ./set and hit enter like in image.


2. Now type 1 to select Social-Engineering Attacks and hit enter as in image.

3. Now type 2 to select Website Attack Vectors and hit enter as in image.

4. Now type 4 to select Tabnabbing Attack Method and hit enter.

5. Now type 2 to select Site Cloner and hit enter.

6. Now enter the site address whom which you want to create fake pages.

7. Now ti will start cloning the site. 8. Now send ur ip address as a link to victim.

9. Now when victim click on it he/she get the fake page and when he fill the details he will got hacked.

 Note : its for educational purpose.

Copyright © 2012 DzireZOne All Right Reserved
Designed by Pirate Rex