Breaking News
Loading...

Recent Post

Showing posts with label Computer. Show all posts
Sunday, April 13, 2014
 How to control the noise and speed of your fans

How to control the noise and speed of your fans


How to control the noise and speed of your fans :-
If your Laptop and Desktop PC are creating a Noise, then it,s time to control the noise and speed of your fans with SpeedFan Application.
SpeedFan is a program that monitors voltages, fan speeds and temperatures in computers with hardware monitor chips. SpeedFan can even access S.M.A.R.T. info and show hard disk temperatures.
SpeedFan supports SCSI disks too. SpeedFan can even change the FSB on some hardware (but this should be considered a bonus feature).
SpeedFan can access digital temperature sensors and can change fan speeds accordingly, thus reducing noise.
Download and Install SpeedFun on your PC.
SpeedFan can automatically control the speed that fans run at ( provided your PC allows this ), to reduce noise. The interface displays CPU usage, fan speeds and temperature’s.


Check the “ Automatic fan speed “ to have the software manage how quickly the blades spin. They will rotate more slowly when it’s cooler inside the case ( when your computer is less active ) and faster when the temperature rises.


For greater control, click Configure. Select the Fan Control Tab and click on the advanced fan control. Click Addand name and tick “Controlled speed”. Select a fan and click Add to link a temperature source ( or sources) to it. The graph shows the fan’s response to heat.


Enjoy your Noise free fan Speed with SpeedFan.
Tuesday, January 21, 2014
How to Customize Send to Menu in Windows

How to Customize Send to Menu in Windows

We all love windows and it’s easy interface and ability to alter and enhance it’s most features according to our likings.One of the most used option in the right­ click menu is the “send to” command. You also must have used this numerous times to send a file to any external drive or to the desktop, or simply zip it!

Now you can remove those unwanted shortcut in the send to menu which appear after installing some Applications or you just want to add your own application or folder for easy access easily by following the steps below.

In Windows Explorer, right­click a file/folder, and then point to Send To. On the menu that appears, click the destination where you want to send your file. The file is sent to or archived/activated by the destination that you select.

Destinations on the “Send To” menu may or may not include any of the following by default depending on your OS and OS version:

Learn how you can customize Send to Menu Windows 7/8/Vista:


Disk drives (local or network)

Fax printers

Printers

Windows­based programs

Compressed (zipped) folders

The desktop

Mail recipients

The My Documents folder

Add a Destination to the Send To Menu

Learn how you can customize Send to Menu Windows XP:


Compressed (zipped) Folder

Desktop (create shortcut)

Mail Recipient

My Documents

3 1/2 Floppy (A:)

CD Drive


First let’s see what a standard send to menu look like­ (Win 7/8)


How to­ do?

Firstly, we need to open the “Send To” Folder. To do this,

Open any Explorer Windows and paste the following in the address Bar.

%APPDATA%\Microsoft\Windows\SendTo

As in the snapshot below :

  • Now you should see some shortcuts in the folder, To delete any entry, simply delete the same.
  • To Add an item, simply copy the desired folder/program and paste its Shortcut in the folder.
  • And now, you would see the shortcut of the folder/program you added in the send to menu as the changes take effect immediately…

Keep in mind that some shortcuts cannot be created there like system files, and make sure to paste valid Shortcuts and not the Program/Folder itself! Hope you liked this easy tutorial to customize Send to Menu in Windows
Stay tuned for more!!
How To Play PS2 Games on PC or Laptop

How To Play PS2 Games on PC or Laptop

Computers are very powerful nowadays and support graphics well beyond that of a PS2, but if you're nostalgic for the games that came on one of the best-selling consoles in the world then you're in luck. This guide will show you how to play PlayStation 2 games on a PC or laptop.


Emulators have come a long way. An emulator is a program virtualizes the run-time environment for something; in this case the environment that we are mimicking is that of the PS2. Now to emulate something like a Gameboy or even a Playstation takes considerable effort, there are plenty of bugs and the creators typically have to do a lot of reverse-engineering; but to emulate the games of a PS2 is actually quite a feat.

Step-By-Step Guide to play ps2 games on pc or Laptop
Follow these steps and you'll be emulating games like your PC was a PS2.

1. The first thing that you'll need is the emulation software. It is called PCSX2.
2. After the download has finished, run the program and finish the setup. This will install the emulator, but in order to actually play games you’ll need a BIOS Pack. 3. Download the PlayStation 2 BIOS pack so that you are able to play games on your emulator. 

4. Locate your PCSX2 folder, which should be wherever the program installed to (likely Program Files). Once you find it, move the BIOS file that you downloaded into that folder.

5. The rest of the process is setup. Start the program and configure the default plugins. There are fields such as GS, PAD, SOUND, CDVD, USB, and others.

You can either leave these fields as they are or configure them to your specifications.

6. After you’ve configured the plugins and clicked Next, you’ll be taken to a screen where you can select the PlayStation 2 BIOS which you moved to your PCSX2 folder. Select Browse and click on the BIOS.

After the path to the BIOS file shows up, make sure you choose the type of console you want the emulator to run as. This can be a European console, Japanese console, or USA console…it all depends on what games you are trying to play and how you want to experience the emulation. After you’ve chosen the BIOS file and the type of console you want the emulator to run as, click Finish.

7. With the setup finished, the program should start running. With the program running, configure plugins and BIOS if need be. Remember the plugins are supposed to be configured for optimal system performance. So, experiment only if you’re getting drops in performance.

8. In the Config menu, located in the toolbar, you can configure your controller settings. This is done primarily for keyboard and mouse since if you’re using a PS2 controller the buttons will be automatically configured.

9. Lastly, choose the ISO you want to run by clicking the CDVD menu. Browse for the file (game) that you want to play and select it. With the file selected go to the System menu and then boot the CDVD that you just selected. You are now ready to play ps2 games on pc or Laptop
Do share with us your experience of Playing PS2 games in your PC or Laptop.
Monday, January 20, 2014
Get alerted when someone unfriends you on Facebook

Get alerted when someone unfriends you on Facebook

For many people, Facebook is the dominant way to stay in touch with their friends, family members, classmates, colleagues and acquaintances. There would be hardly any one in your social circles who uses the internet but not Facebook. Unlike Twitter where you don’t necessarily have to follow back your followers and vice versa, Facebook still uses the classic ‘Friends’ feature, allowing users to add each other in a snap. You get a notification when someone sends or accepts your friends requests. and the list of all your friends can be viewed under one roof. However, Facebook doesn’t send a notification or inform you in any manner if any of your existing friends suddenly decides to unfriends you on the social network. That’s where the Chrome extension Unfriends Notify For Facebook comes to the rescue. As the name implies, it lets you view the list of people who have unfriended you on Facebook.

 I personally don’t mind not having such a feature in place, as it helps people unfriend others on the social network without getting into any arguments over it (at least till they find out by any other means that you’ve unfriended them.) But hey, that doesn’t mean no one wants such a feature at all; in fact a lot of users would want to know who has unfriended them.
The only limitation of Unfriend Notify is that users have to be using Google Chrome. Setting the extension up is dead simple; all you have to do is download it from Chrome Web Store, and the rest is done by the extension itself.
Once the extension has been downloaded and installed, login to your Facebook account and then navigate to the ‘Friends’ section. Just next to the Friends heading, you will notice a new link called ‘Lost Friends’. Clicking this link lets you view the list of friends you’ve lost on Facebook, It also displays the total number of people who have unfriended you. To make things even more convenient, the extension also displays push notifications near the system tray when someone unfriends you, and you can temporarily disable these notifications to one hour or the whole day.

Overall, it’s a very simple extension built to perform a very specific task that has never been provided natively in Facebook. It’s available for free at the Chrome Web Store and you can download it via the link provided below.You can also download it for Firefox.


Saturday, January 18, 2014
Disable USB ports on Windows PC via Registry

Disable USB ports on Windows PC via Registry


With this trick, you can disable access to your USB(Universal Serial Bus) ports in your Windows based PC to prevent people from taking out data from your personal computer without permission or spreading viruses through the use of USB(pen and flash) drives. 

To use this trick to disable USB ports, follow the steps given below:

  1. Click on Start.
  2. Click on Run. If you cannot find RUN, type it in the search box or use "Windows key+R".
  3. Type "regedit" without quotes. This will launch the Registry Editor.
  4. Navigate to  HKEY_LOCAL_MACHINE\SYSTEM\CurrentControlSet\Services\usbstor.
  5. In the work area, double click on Start.
  6. In the Value Data box, enter 4.
  7. Click on OK.
  8. Close Registry Editor and refresh your desktop.
  9. To re-enable access to your USB ports, enter 3 in the Value Data box in Step 6.


Try it yourself to make your PC invulnerable from data theft and malware which spread through USB ports. This works on Windows XP, Windows Vista, Windows 7 and Windows 8.

Note: This trick also disables access to your USB connected peripheral devices. So, do not use it if you have USB connected keyboard and mouse.
Convert FAT32 to NTFS Without Formatting or Losing Data

Convert FAT32 to NTFS Without Formatting or Losing Data


You have a flash drive or probably an external hard drive that currently has FAT32 file system and you want to change it to NTFS, because FAT32 does not support handling large files (over 4GB) or it is just simply old for your taste but there is just one problem, you don't want to lose your saved data. This article is for you then as it explains exactly how you can achieve seamless transition from FAT to NTFS without involving any data loss.

While it is generally recommended to use the NTFS file system because of its stability, security and lesser defragmentation time, most of us end up using FAT32 because that is what most disks are preformatted with. Unless, we notice the “Not enough disk space error” despite disk space being available, we don't bother to change the file system. Moreover, most of us don't change it because of the risk of losing important data and lack of time (read laziness). As Microsoft was aware of this scenario, they added a capability in the command prompt to overcome this by executing a simple command. There are many software that support this too but the Convert command is one of the easiest ways to do so. Follow the steps below to know how:-


Important: While this method works perfectly, I would still advise you to backup your data in case anything goes wrong.


FAT 32 to NTFS Conversion Steps:

1) Go to Computer, and note the name of the drive whose file system you wish to convert.
2) Click on Start.
3) Type cmd in the search bar if you use Windows 7, Windows 8 or Windows Vista. If you use Windows XP, click on Run and then execute cmd. 
4) Execute "chkdsk h: /f" (without quotes) where H is the letter of the drive to undergo conversion. This checks the drive for errors and fixes them automatically.
5) Execute "Convert H: /FS:NTFS" (without quotes). H is again the letter of the drive to be converted.
6) The command prompt will start the conversion process and after a few minutes, CMD will say that conversion was successful.
7) You can check it in the properties of the drive through right click>Properties.


This works on Windows 7, Windows XP, Windows 8 and Windows Vista. I converted my flash drive's file system using these steps and it worked flawlessly. It is interesting to note that this method cannot be used to reconvert NTFS file system back to FAT32. To reconvert back to FAT32, you will need to format the entire drive which will definitely cause data loss.
Shutdown Your Computer or a Remote PC via Command Prompt

Shutdown Your Computer or a Remote PC via Command Prompt


Most of us shutdown our computers using the power button given in the Start menu. Some of us use the physical power button on our machines. Very few people actually use other means of shutting down a computer and even less is the number of people who use the command prompt to shutdown a computer.

A reason for this is that most of us don't know that the command prompt can be used to not only shutdown, restart or log off our computer instantly but also to shutdown a remote computer provided you have administrative access. It can also be used to hibernate a computer and give a comment containing the reason for shutdown. This post will show you how to do all this.

Required:
A computer running Windows (XP, Vista, 7 or 8) with the command prompt working perfectly, i.e. not disabled by a virus.

Initial Steps: 
1) Press Windows Key + R.
2) Enter "cmd" and press Enter.

This will start the command prompt. Follow the instructions below depending on what you want to do.

Shutdown Local Machine (Your Computer)
Type "shutdown -s" without the quotes in the command prompt and press Enter. Shutdown is the command being executed and the switch -s tells the computer to shutdown.

Restart your Local Computer 
Type "shutdown -r" in the command prompt and press Enter. In this case, the command switch -r is telling the computer to restart after shutdown.

Log Off the Current User
Type "shutdown -l" in the command prompt and press Enter. The -l command switch tells the computer to log off.

Shutdown a Remote Computer
Type "shutdown -s -m \\name of the computer" in the command prompt and press Enter. Replace \\name of the computer with the actual name of the remote computer you are trying to shutdown. As mentioned earlier, you must have administrative access to the computer you are trying to shutdown. To know if you have administrative access, press Windows key + R and then type the name of the computer and press Enter.

Note: If you don't remember the name of the remote computer, you can look for it by opening a list of all the computers you are connected to by executing "net view" in command prompt.

If you can connect to the computer, you will be asked to login with your username and password. Upon entering them, a window will display the list of all the directories available to you. This should help you know whether you can or cannot shutdown the remote computer.

Hibernate a Local Computer
Type in "Rundll32.exe Powrprof.dll,SetSuspendState" without the quotes and press Enter. Your computer should hibernate, if it does not, then you must enable hibernation to do this.

Shutdown your or a remote computer after a specific time
Type "shutdown -s -t 60" to shutdown your computer after 60 seconds. Upon executing this, a countdown timer displaying a warning message will be shown. This command uses the -t command switch followed by a variable (which is 60 in this case) which represents the number of seconds after which the computer will shutdown.

Display a Message containing the reason for shutdown
Type shutdown -s  -t 500 -c "I am tired. I don't want to work anymore." (with the quotes) in the Command Prompt and press Enter. The -c switch is used in the code to give the reason for shutting down and what is followed in quotes will be displayed in the dialog box as the reason. This can be used to display all sorts of funny messages. 
One example :-
Skynet has become self aware. John Connor did not stop me. You can not use your PC anymore.

Stop a System Shutdown
Type "shutdown -a" and press Enter. This will stop the system from shutting down if the countdown to shut down has not reached 0.
Monday, January 13, 2014
How to Force an MSI Package to Install Using Administrator Mode?

How to Force an MSI Package to Install Using Administrator Mode?


When you need to install a program as an administrator, you can right-click on the .exe file and select Run as administrator. However, that option isn’t available for MSI packages. We will show you how to add an Install as administrator option for MSI packages.


To add the Install as administrator option to the context menu for MSI packages, right-click on the Start button and select Run from the command menu, if you’re using Windows 8.1. If you’re using Windows 7 or another earlier version, select Run from the Start menu.
NOTE: You can also press the Windows key + R to access the Run dialog box.


Enter “regedit” (without the quotes) in the Open edit box and click OK. 


If the User Account Control dialog box displays, click Yes to continue.

NOTE: You may not see this dialog box, depending on your User Account Control settings.


Navigate to the following key:
HKEY_CLASSES_ROOT\Msi.Package\shell
Right-click on the shell key and select New | Key from the popup menu.


The new key is added as a sub-key under shell. Rename it to “runas” (without the quotes).

 Right-click on the Default value in the right pane and select Modify from the popup menu.

NOTE: You can also double-click on Default to edit its value.

 On the Edit String dialog box, enter “Install as &administrator” (without the quotes) in the Value data edit box and click OK.


Now, you need to add a sub-key to the runas key. Right-click on the runas key and select New | Key from the popup menu. Rename the sub-key “command” (without the quotes).

Select the command sub-key and double-click Default in the right pane to edit its value. On the Edit String dialog box, enter the following in the Value data edit box:
msiexec /i “%1”
Click OK. 

Close the Registry Editor by selecting Exit from the File menu. 

Now, when you right-click on an MSI installation package file, the Install as administrator option is available. 

When you select the Install as administrator option, the User Account Control dialog box may display, as shown at the beginning of this article, depending on your UAC settings.
Saturday, January 4, 2014
How to Get Website Info Using Cmd?

How to Get Website Info Using Cmd?


Despite most operating systems nowadays have graphical user interface and most of the tools are implemented using one, the command line prompt (cmd) is still a powerful tool. This is especially true when it comes to performing administrative tasks or advanced networking information queries. In this article, we'll show you how to find many network related information about a website using the command prompt. For examples, the article will be using the Google website.


Start the command-line prompt. 
  1. This is usually done by one of the following methods:
    • Going to Start >> All Programs >> Accessories >> Command Prompt on Windows Vista/7. According to your settings, in older systems (XP, 2000, etc), you might find "Accessories" directly on "Start"
    • Go to Start >> Run and then type cmd in the run dialog and press Enter.

Method 1 of 3: IP Address and Connectivity
1>Type the following command to the command-line prompt, replacing google.com with the         website you want to get the information for:
  • ping google.com

2>Find the IP address of the website (more precisely, the server) on the first line, where it says "Pinging Website_Address_You_Entered [X.X.X.X] with 32 bytes of data:"


3>Notice the connectivity between you machine and the server from the line where it says: "Packets: Sent = X, Received = X, Lost = X (X% loss)," where all the Xs will be replaced by numbers. This gives you an idea of how much percent of the packets sent to the server will be lost.


Method 2 of 3: Routing Information

1>Type the following command to the command-line prompt, replacing google.com with the website or server you want routing information for:
  • tracert google.com

2>Notice the listing of hops along the route path of packets from your machine to the server.This gives you an idea of how many routers/hops the packet has to travel before reaching the server, starting from your machine.


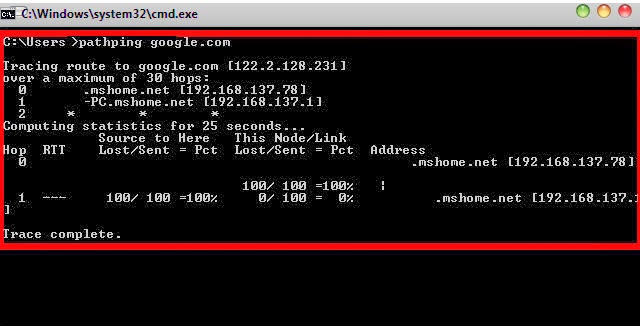
3>Use the pathping utility to find information about network latency and network loss at intermediate hops between a source and destination. Type the following to the command-line prompt: pathping google.com.
  • Pathping sends multiple Echo Request messages to each router between a source and destination over a period of time and then computes results based on the packets returned from each router.


Method 3 of 3: DNS information
1>Type the following on the command-line prompt, replacing google.com with the website or server you want DNS information for:
  • nslookup google.com

 2>Find the DNS server (first lines) and the IP addresses of the server you queried about.


TIPS:
  • If you're using these command in a corporate network or a school network, some of these commands might not give you results. Most institutions have firewalls with settings to deny services provided by these tools.
  • Some of the commands explained above have other options that might be useful for finding out information about your internal network.
Get someone’s Name and Address from their IP address?

Get someone’s Name and Address from their IP address?


Yes it is technically possible to get someone’s name and address from their IP address, But it’s probably much difficult task and it’s about to involve law enforcement.
There is basically NO WAY for us common user to “track down” and pinpoint or locate a person to their house via the internet just by using the IP adress and hunting ourselves. The closest you may get is obtaining their IP address, and going to a site like “Geobytes.com” and clicking “IP Locator” and it will give you what city they may be from, it doesn’t get any closer than that.

Publicly available information

The best you can do without help is to identify their ISP – Internet Service Provider. To actually identify the person you’ll need that ISP’s help, and that will likely take a court order. It depends on what ISP (Internet Service Provider) you are using. Some use a static IP which means your IP address is always the same and some use an dynamic IP meaning the IP changes every time you sign on to the internet. But as netstat will give you many results you need to distinguish it, so I suggest that you take the snapshot of the listings and do the analysis later or user various softwares like ethereal etc.
In order to register for an email address, the email provider usually asks for a name and other personal information. If an email is sent out through the webmailer, this name is typically added to all emails sent out. If you use an email program, the name you set up the account with in that program is included in the sent emails. This is a feature, as most people want it that way. If you prefer to remain anonymous, you would have to include a pseudonym.

How to Get IP Address while Chatting

Getting IP address of someone is not a big task, But in this post i will show you how to get someone Ip address using PHP script. This trick works in Facebook,gtalk,hangouts and yahoo Chat etc. 
Just follow these simple Steps:

Step 1:

  • Open Notepad 
  • Copy this Code & save it with name iplocate.php 
<?php
$hostname = gethostbyaddr($_SERVER['REMOTE_ADDR']);
$img_number = imagecreate(400,95);
$backcolor = imagecolorallocate($img_number,10,102,153);
$textcolor = imagecolorallocate($img_number,255,255,255);
imagefill($img_number,0,0,$backcolor);
$number0 = ” This is Your IP/Proxy”;
$number1 = ” IP: $_SERVER[HTTP_X_FORWARDED_FOR]“;
$number2 = ” Host/Proxy: $hostname”;
$number4 = ” _________________________________”;
Imagestring($img_number,10,5,5,$number0,$textcolor);
Imagestring($img_number,10,5,25,$number1,$textcolor);
Imagestring($img_number,10,5,45,$number2,$textcolor);
Imagestring($img_number,10,5,50,$number4,$textcolor);
Imagestring($img_number,10,8,50,$number4,$textcolor);
Imagestring($img_number,10,5,10,$number4,$textcolor);
Imagestring($img_number,10,8,10,$number4,$textcolor);
header(“Content-type: image/png”);
imagepng($img_number);
$file=fopen(“Name-here-to-protect-the-File.txt”,”a”);
$file2 = “- IP joined – IP/Proxy: $_SERVER[HTTP_X_FORWARDED_FOR] – Host: $hostname – ‘\n’ “;
fwrite($file, $file2);
fclose($file);
?>

Step 2: 

  • Make an account on any Free or premium Web-Hosting site.

Step 3: 

  • Upload iplocate.php  to your web hosting Site

Step 4:

  • Copy Link of this uploaded file & send it to victim.

Step 5: 

  • As the Victims Click on your Link, His IP will be saved in your Web-hosting account
Change Your IP address

Change Your IP address


Step 1. Click on “Start” in the bottom left hand corner of screen
Step 2. Click on “Run”
Step 3. Type in “cmd” and hit ok You should now be at an MSDOS prompt screen.
Step 4. Type “ipconfig /release” just like that, and hit “enter”
Step 5. Type “exit” and leave the prompt
Step 6. Right-click on “Network Places” or “My Network Places” on your desktop.
Step 7. Click on “properties”
You should now be on a screen with something titled “Local Area Connection”, or something close to that, and, if you have a network hooked up, all of your other networks.
Step 8. Right click on “Local Area Connection” and click “properties”
Step 9. Double-click on the “Internet Protocol (TCP/IP)” from the list under the “General” tab
Step 10. Click on “Use the following IP address” under the “General” tab
Step 11. Create an IP address (It doesn’t matter what it is. I just type 1 and 2 until i fill the area up).
Step 12. Press “Tab” and it should automatically fill in the “Subnet Mask” section with default numbers.
Step 13. Hit the “Ok” button here
Step 14. Hit the “Ok” button again You should now be back to the “Local Area Connection” screen.
Step 15. Right-click back on “Local Area Connection” and go to properties again.
Step 16. Go back to the “TCP/IP” settings
Step 17. This time, select “Obtain an IP address automatically” tongue.gif
Step 18. Hit “Ok”
Step 19. Hit “Ok” again
Step 20. You now have a new IP address
With a little practice, you can easily get this process down to 15 seconds.
Copyright © 2012 DzireZOne All Right Reserved
Designed by Pirate Rex